Showing posts with label DIY. Show all posts

4.18.2010

Last Minute Project(s): Prettified Pots + Paper Products & Programs

Alliteration much?

Part 1: Prettified Pots 

I ended up doing our table assignments, um, the week before our wedding- finishing the last of them around fifteen minutes before we left for our rehearsal.  This is something I would NOT recommend, as it was NOT  fun, at all.  I knew I didn’t want to have place cards, just escort cards (if you don’t know the difference- I didn’t- read here), and because I had no idea what to do (at this point, my brain was fried), I emailed my wonderful DOC freaking out asking for advice.  She suggested nixing the escort cards, and made my life somucheasier by recommending a table assignment card for each table instead of a card for each person.  I decided to go with one of her suggestions for creating the table assignments and high-tailed it over to JoAnn’s to pick up supplies.  For 22 tables, I ended up buying 22 terra cotta pots of varying size (the cheap ones) and around seven to ten spools of ribbon.  Why did I need these supplies?  So I could make these**:

IMG_3613
**No, my wedding colors didn’t suddenly change to grey and yellow.  Because this was a last minute project, I did not have time to take pictures.  Fear not!!  because I have a tutorial for you below!

Much, much better than what they started out as, don’t you think?

IMG_3588

Here’s the “how to”:

You’ll also need a glue gun in addition to the pots (for one tiny pot I used about half a spool of ribbon/ ~6’ of ribbon- this sounds like a lot, but it really isn’t).  Also, you can cut down on your costs by buying supplies individually/early on and using coupons.  I LOVE COUPONS. 

Start by hot gluing one end of the ribbon to the pot (picture 1), then pull the ribbon straight down along the side of your pot, holding it on the glued edge, so it doesn’t move around (2).  Make sure once more that the ribbon is straight, then place a glue line along the bottom edge of the pot (3) and press the center of the ribbon down first, then pull either side further in and press down so that the ribbon curves to the pot (4).  I should also note that I left the ribbon on the spool while gluing it to the pot and only cut after the end of the ribbon was glued to the bottom of the pot.

IMG_3597IMG_3598IMG_3599IMG_3605

Repeat steps 1-4 for each quadrant of the pot.  I glued the first two across from each other, and likewise with the second two so that there was even spacing amongst all the strips:

IMG_3606IMG_3607

Then repeat steps 1-4, gluing two ribbon strips between each quadrant strip:

IMG_3610
Do this until your entire pot is covered.  I personally like the overall look of darker ribbon because it is less see through, but that’s just me.  After the pots were covered, I went back and glued these thinner ribbons using the same method:

IMG_3616

In addition to holding table assignments, I think they would look lovely as centerpieces :)

IMG_3618

Part 1.5:  Paper Products

I have a secret, wanna know what it is?  I downloaded a trial version of Adobe Illustrator, for FREE, 2 weeks before the wedding and made our table assignments, table numbers, and programs using it.  (Miss Ribbons made her awesome invites using it too!)  To spice up our table numbers/assignments/programs, I bought a vector image from iStock.  Here is what our table numbers looked like:
 table number copy

I printed them out on ivory cardstock  left over from our table assignments. I bought the cardstock from JoAnn’s, which was on sale for 50 sheets/ $2.50.  Cheap?  Yes!  The best quality?  Probably not, but they served their purpose well.

I printed out each number twice (front & back of our table numbers).  After all 44 squares were printed and cut, I glued each front and back to a ~12” dowel of basal wood (also found at JoAnn’s) and then stuck/hot glued them into a half-cylinder of styrofoam covered with moss.   Yes, I admit, this sounds ghetto and since I have no pictures of this process, you’ll have to trust me when I say, THEY DIDN’T LOOK THAT BAD :)

For the table assignments, I used a similar vector image to the one shown above in our table numbers, and printed them out on 5”x7” sheets of cardstock, stuck them to ~12” dowels of basal wood, and hot glued them into the center of the prettified pots that were filled with styrofoam, topped with moss.  Again, no pictures of this process but I promise, THEY DIDN”T LOOK THAT BAD EITHER.

Part 2:  Programs
I used a similar vector image for our programs and laid out each page (4 pages total) in Illustrator.  This was so much easier to do in Illustrator than in the crappy version of Photoshop that I have- um version 7.0 anyone?  After I got everything looking good, I printed them out on cardstock.  I was able to get two pages per sheet of cardstock and after, some trial and error, I printed on the reverse side also. 
The end result?  Our 8-page program, only used up two pages of cardstock!

I HAVE ANOTHER SECRET:  I was going to cut them all out myself.  I'm pretty sure that when I told Mr. Beagle this, he looked at me like I had two heads  But I didn’t, because I discovered that Office Depot would do it for around five dollars.  Sweet!  So after Office Depot took care of my dirty work in around two minutes (that would have taken me, um, several hours) , I took home my freshly cut paper to assemble our programs.  I hole punched two holes in each sheet and then tied both sheets together with some 50 cent ribbon from JoAnn’s .


Want a sneak peak of what they looked like at our wedding?

10.24.09 W0672photo by our wonderful photog:  Ashley Smith

Are you doing assigned seating at your wedding?  Are you doing anything creative to display escort cards/ place cards/ table assignments?

3.11.2010

Favor Food

For our wedding, it was super easy to decide on what we wanted to give away as favors.  I, for one, am a huge fan of all things sweet and knew it would be the perfect food item to send home with our guests.  (And you can read more about our choice here).

So when I came across this site today, via this blog, I knew I had to share it with y'all because I think it would make the perfect addition to any wedding (or shower, or party, or really any occasion at my house).  The idea?  Individual pies in canning jars!  I love, love, love this idea and if I wasn't already married, I might throw my original idea out the window, just so I could incorporate these instead!!!


They are completely customizable with flavors, so you can make a variety if you so choose.  Plus, who doesn't love canning jars?  Still need more reasons?  They're super easy to make.  Don't believe me?  You can find the tutorial here.  And if you wanted needed (we all know how little time brides have to DIY) to simplify even more, you could just use ready-made pie crusts and canned fruit fillings instead of making them from scratch. 

The best part?  You can make them ahead of time and freeze them!  Canning jars were meant to be easily
stacked and stored.


Once you're ready to serve them, just take them out of the freezer, pop them in the oven (canning jars are made to handle high temperatures- see the tutorial for details on this), and an hour later, voila they're done and ready to eat!


I know I would love to receive (or give) one of these as a gift!  Are you making edible favors?  If so, what'cha making?

8.12.2009

I Must Be Crazy....

...because I found something else to DIY.

Our ceremony will take place in the church I grew up in. They just recently built a new addition to house the sanctuary and I have had a hard time figuring out what I wanted to use for decor.
I wish I had pictures, but I don't. So you're just going to have to picture this in your head: the sanctuary is very open, with stained concrete floors, modern light fixtures, and a high vaulted ceiling. The aisle is very short and leads up to the alter, above which hangs a giant wooden cross .
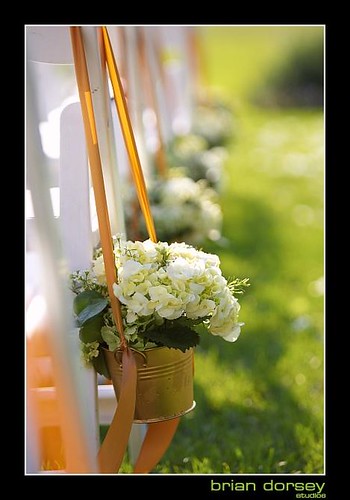
I wanted simple, minimal decor ideas for the aisle pews. Something along the lines of this:


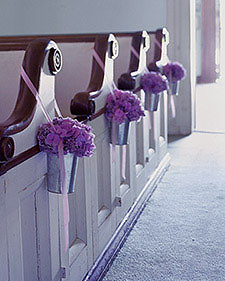
And then, Miss D'orsay posted these:


*sigh*
Aren't they perfect? So... I decided to DIY some pomanders for our church pews (thanks D'orsay!!!). I used the same tutorial as Miss D'orsay. However, instead of using tissue paper, I used ivory tulle (not bridal tulle... just plain, ivory, matte, tulle- the cheap stuff).

When I bought the styrofoam, I accidentally bought 6" spheres instead of 5" (it makes a difference in terms of how much fabric you need). I haven't made any 5" pomanders yet, so the instructions I'm giving are for a 6" foam sphere.

Supplies:
6-7 yards of cheap tulle (this runs about $1.50/yard... and you know I bought mine on sale :))
1 white 6" styrofoam sphere
1 package of 20 gauge floral wire (I bought green wire and it doesn't show, so any color wire will do)
Hot glue gun & glue sticks

To make the individual flowers:
Fold the tulle in half matching bias to bias. Then, fold it in half again after that. I cut 5" strips of tulle and keep the existing folds in place. I accordion folded the tulle to approx. a 1" width. Then I twisted the floral wire around the center of my accordion fold. I then rounded the tops. Adhere each flower to the Styrofoam sphere as is stated in the referenced tutorial. I would like to note that the tulle doesn't fluff out as much as the tissue paper seems to fluff (I haven't made a tissue pom so I don't know for sure). Because of this, I think this project requires more flowers. Bridal tulle is a little more malleable, but it's twice as expensive.

The result:


What Bee DIY projects have you been inspired by?

5.21.2009

DIY Tutorial- Ribbon/Fabric Flowers


Supplies:

-Ribbon (I used 1 1/2" width w/ the wire-lined edges- it stays in place better) OR 44"/45" fabric (I used special occasion fabric).
-coordinating thread
-needle
-buttons, beads, (or you can just use thread), to use as embellishment

How To:

Thread your needle and tie a knot at one end. Put aside to be used for later.
For Ribbon: Cut about 22"-24" of ribbon from your spool.
For Fabric: Fold fabric in half, selvage to selvage. After squaring up your fabric, cut a 1 1/2" wide strip.


Start by folding over the ribbon/fabric on one end to make a pleat like this:


Continue holding the pleat against the edge of the ribbon/fabric with one hand. This will be the center of the flower. Continuing making new pleats towards the center while holding the existing pleats together:


Continue this process until you reach the starting point:


Begin a new row on top of the first row, while continuing to hold the ribbon/fabric together at the center. Pleat until you can pleat no more!...um, or until you have reached the end of the ribbon/fabric:


Collect the threaded ribbon and sew through the middle of the flower, making close, small stitches:


Make sure the flower stays together without having to hold it.


Petals:
To make petals (as I did with my shoe flowers), I just used a small pair of scissors to cut petal shapes into the fabric.


Embellishments:
If you have enough length in your thread, continue to use the same thread to sew on the beads/buttons/etc. otherwise sew a knot on the end and use a new thread. I used small beads for my ribbon flower (and some vintage looking buttons for the fabric flower):


Add anything else as you see fit :)


Done!
Now it's your turn! :) Share a tutorial you've found helpful in your wedding planning.

4.18.2009

Bridal Tea: Gifts for the Guests

This weekend, my FMIL hosted my first bridal shower. I knew she was bringing a gift for all the guests, and since I wasn't sure what the proper etiquette was,I decided to get a quick gift together for all the guests as well. Since the shower was a "tea party" theme, I thought a tea themed gift would be appropriate. I went to Hobby Lobby yesterday to pick up some paper bags, which were kind of expensive... and I also found some at Target which were really cheap.

However, the Target bags were really wrinkled and were kind of lopsided when I tried to stand them up... so I went with the alternative. (Lesson learned: cheap is not always better). I also picked up two boxes of tea (what else?) and a package of cookies from Target. I supplemented this with some more cookies that I baked Saturday morning... thank you Martha Stewart.
I trimmed the top of the bags to create the bumpy edge. I created slits in the paper bag with an exacto knife and just pulled a ribbon (bought from Hobby Lobby- isn't it tea partyish?) through, tied a pretty knot, and snipped the ends. Unfortunately, this project was kind of thrown together at the last minute because, like the rest of Austin, I was suffering from severe allergies for most of last week. However, I think the guests still enjoyed it and appreciated the thought and effort.

Martha Stewart's Recipe for French Butter Cookies:
1 c unstalted butter, room temp.
2/3 c packed light brown sugar
1 large egg
1 tsp vanilla extract
2 1/2 c flower(sifted)
1 tsp kosher salt (I didn't include this and they tasted fine)
1/2 c granulated sugar

1. Combine sugar & brown sugar in an electric mixer and cream on high speed until fluffy, 2 to 3 minutes. Add the egg and vanilla and mix to combine. Add the flour and salt, and mix on low speed until the flour is incorporated.
2. Roll the dough into 3-1 1/2 in. diameter logs. Wrap in plastic wrap and refrigerate until firm, at least 1 hour or overnight (I refrigerated mine overnight).
3. Preheat oven to 350. Line baking sheet w/ parchment paper (I used wax paper). Roll the cookie logs in the granulated sugar, coating them evenly, and slice into 1/4 in. rounds. Place them on a baking sheet about 1 in. apart.
4. Bake until golden brown, 15 to 20 mins. Remove from baking sheet and let cool completely. Cookies will keep at room temperature in an airtight container up to 1 week.

Anyone else stumbling through wedding etiquette 101? Are you giving your guests gifts at your shower?

4.06.2009

In the Mail: Save the Dates...

finally! I am almost finished addressing these suckers and they will be in the mail this week! I bought the envelopes online. I had originally ordered a pretty cheap box of 100 ivory envelopes for about $15 (I can't remember the source at the moment), but when they came in, they were thinner than I wanted them..... So I ordered more, from paper-source. In this case, price = quality. I think I paid $4.50/10 envelopes ( I ordered about $25 worth). In the end, I wasn't able to send every save the date in a paper-source envelope... but now I know where to order my envelopes for next time.
Paper-source envelopes, neatly packaged:


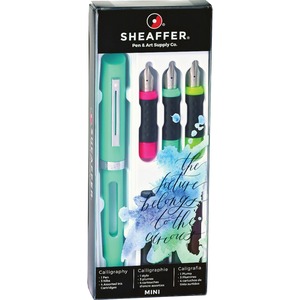
I had thought about just printing addresses on the envelopes (easy right?), but then I saw how nice calligraphy (more like writing with a calligraphy pen) looks... So, I decided that maybe I could address them myself using a calligraphy pen. I narrowed it down to three different types:
Pen w/ non-replaceable ink:

Pen w/ replaceable ink:

source

Dip pen w/ bottled ink (traditional calligraphy pen):

source

Unfortunately, instead of researching these different options beforehand, I ended up buying one of each and trying them out. :) I found option 3 difficult to use (I think this option requires lots of patience and practice... I didn't have enough time for either), so that left me with options 1 & 2. Between the two, I liked option 2 the best because the option of different ink colors and there was also a good selection of pen tips (i.e. skinny to fat) to choose from. I was able to address (including the return address) almost all of our save the dates using one ink vial. (Not too bad!) I ended up buying a calligraphy kit that included several ink colors and three different pen tips. I figured if the save the dates went smoothly... I would be able to use these for our invitations as well (and for any future event that requires pretty writing).
And now for the finished product:


As much as I like to think that I can write in straight lines, I just can't. So I drew light lines on the envelopes before writing the addresses. Then I used a good eraser to remove them. I noticed that the lines were easier to erase on the better quality envelopes than on the cheap ones (so I guess it pays to buy the better quality when it comes to envelopes, this is something I hadn't considered prior to "save the dates", or the wedding for that matter). I also realized that addressing takes a lot longer than it looks. It took me two Saturday afternoons to finish these (about 50 envelopes) up... good to know for next time. :) Any one else using calligraphy on their invites?

3.26.2009

I Heart Fabric

(a lot)
And I "collect" it. Yes, I'm one of those people- a "fabric hoarder". As is evident by this:


I wanted to incorporate fabric into the wedding because, well, I love it... and I love to sew. Conveniently, since I knew I wanted to avoid using fresh flowers if at all possible, I had a solution. I decided to make our (and by "our" I am including the bridal party as well) bouquets and boutonnieres from fabric. I searched many sources online (including Martha Stewart and Etsy) to get ideas on what fabric bouquets and flowers should look like, but I really didn't find anything that inspired me enough to produce an exact replica. The solution? I worked from scratch to create my own design.

The fabric:

I plan on using dark and light purples in my bouquet & browns, ivory & shades of pale blue for the 'maids. I tried to choose fabrics that varied slightly in texture and color and complimented one another. Carrying bolts of fabric around Joann's was the simplest method of accomplishing this. I also picked up some green fabric (mostly because it was on clearance):

I'm not sure if I will work it in or not.

I created a "trial" 'maids bouquet (not yet sure if I will use it):


I'm still working out a design for the stems and I like the overall shape and color scheme. Originally I was going to make all the 'maids' bouquets the same, but I think I'm going to vary each of them slightly. I'll keep the same color scheme, but I will be using different textures of fabric and different flower forms. As I continue the process of making/adding onto the bouquets I will post them. I haven't come up with a solid idea for the bouts yet, so I think I will wait until all of the bouquets are finished and then make complimentary bouts for each bouquet :)

How have you incorporated your hobbies into your wedding?